How to use Pogoshell
Chapters:
- What is Pogoshell?
- How it works
- Installing Themes
- Users
- Save Management
- Installing Plugins
Advanced:
- More about pogo.cfg
- Compressing plugins/MODs
- Converting s3m modules to k3m
What is Pogoshell?
Pogoshell is a very helpful and neat utility that will turn your GBA menu into something similar to windows for your computer! Basically, it's a replacement for the menu that LittleWriter or MrTOOL creates. But it is much more than that. Here are some of the features and advantages that Pogoshell has:
- Theme-able interface with backgrounds, icons and fonts etc.
- SRAM management on the actual GBA No need to connect to a computer. Delete, move and copy savegames right on your GBA
- Plugins for all kinds of stuff. By default Pogoshell has plugins for nes emulation, gb emulation, pce emulation, tracked mod music and nes music. But many others are available on the net.
- Put ANY file on your GBA Not just with the .GBA extension.
- Play Music, view Pictures, read e-books + much more, right on your GBA
- List of games and files are shown with the actual filename instead of the rom header.
- Users. Another very helpful feature. Each user has its own set of saves. If you change user your old saves will be "hidden" and all your saveslots are free so you can have more saves than the game allows you to.
How it works:
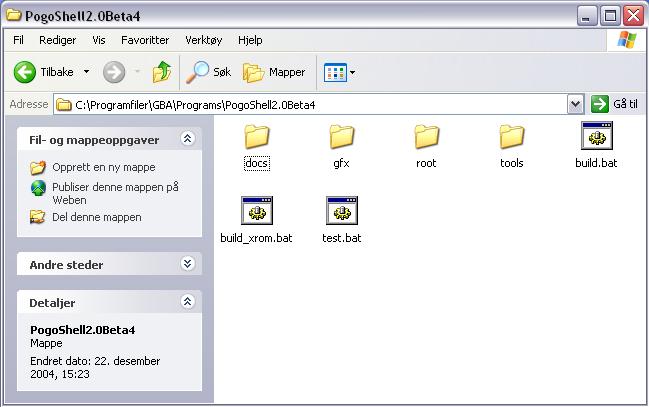
Ok, I will now show you the basics on how Pogoshell works and how to use it. First, download Pogoshell 2.0Beta4. Unzip it (it doesn't matter where) and go into that folder. This is what you will see:
I'll explain everything in this folder.
docs: Documentation that comes with Pogoshell You don't need to worry about this. but you can check it out if you want to.
gfx: The graphics on the default theme. I'll come back to this later, but it's not really important.
root: This is important! What you put in here will show up on your GBA! You can place any files here, make folders or anything you like.
tools: Various tools to convert files. You don't really need this (more about this in the advanced chapters of the guide).
build.bat: Since you have a X-Rom cart, you won't be using this at all.
build_xrom.bat: Instead, this is what you will be using. When you are done putting all your files into the root folder, you execute this and it will build the file you should flash to your cart.
test.bat: Used to test your file in VBA, but you can do it manually too so you don't really need it.
Now, go into the root folder to see what we got.
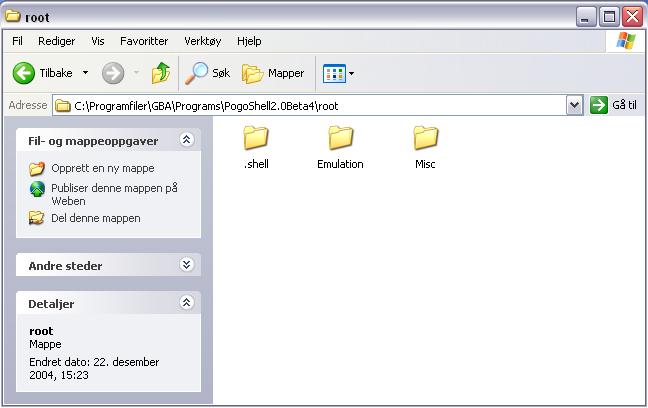
Alright... This is what will show up on your GBA! Well, except the .shell folder. It's a system folder so this will be hidden by default. Do not delete it! It includes files that are important for Pogoshell to run. But the two others folders are only example folders. Open them both to check if there's anything you want. If there's not you can just delete them. Now you're all set! Put all the files (that includes GBA roms) and folders you want in here.

This is what mine looks like. Inside the Emulation folder I have a few GB and NES roms and in the Multimedia folder a few MODs and BMP pictures.
Note: When using Pogoshell you must manually SRAM patch all games that use either FLASH or EEPROM saving! Read in the GBATA section to find out how to SRAM patch roms. It is also recommended that you trim your roms to get more space on the cart. This is also explain in the GBATA guide. Finally, If you want to be able to get back to the Pogoshell menu without having to reboot your GBA read the BOMA guide to learn how to BOMA patch roms. All this must be done BEFORE you build your Pogoshell file.
When you feel you're satisfied, go back to your Pogoshell folder and run build_xrom.bat. A dos window will appear while it's building and then go away leaving a file called "flashme.gba" in the same folder. That file and ONLY that file is the one that should be flashed on your cart. It includes your themes, settings and everything you put in the root folder. It MUST be flashed alone in SINGLE-ROM MODE to your cart. I strongly recommend you use usbcable.exe or one of it's GUIs (X-Rom Flasher and X-Rom FrontEnd) for Pogoshell builds. If you are unsure on how to flash with X-Rom Flasher read the Getting Started section on Basic Flashing with X-Rom Flasher (single-rom mode).
But first lets take a look at what the file we just created looks like. Open flashme.gba in an emulator like VBA. Go into the ROM drive and check it out. This is what mine looks like:

Note: Using Pogoshell in an emulator will only show the menu itself. Launching a GBA rom will NOT work. It will simply reboot the menu. A few plugins might work... Others won't. Only use VBA to see what the menu looks like or to test a theme etc.
If you're happy with the result, flash it to your cart!
Ok, that's the basics. Now we will go a step further to explain some more advanced features in Pogoshell
Installing Themes:
In this example I'm going to download a few themes from bilwabo's website and install them into my Pogoshell menu. There are many other great Pogoshell theme websites as well, so you don't have to download one from this site. Anyway, find one or more themes you like and download them. But make sure they are Beta 4 themes otherwise it wont work.
I have created a folder called Themes in my Pogoshell folder. This is where I will unpack all the themes I download so that I can easily change between them anytime I want. Of course, you don't have to do this yourself if you don't want to.
Before we install the theme we are going to delete the old theme. This is optional, you don't really have to do it. The new theme will overwrite existing files but different themes can sometimes use different files, meaning you will have some files on your cart which are never used. So deleting it will save a little bit of space on your cart. Go into your root folder, and then the .shell folder
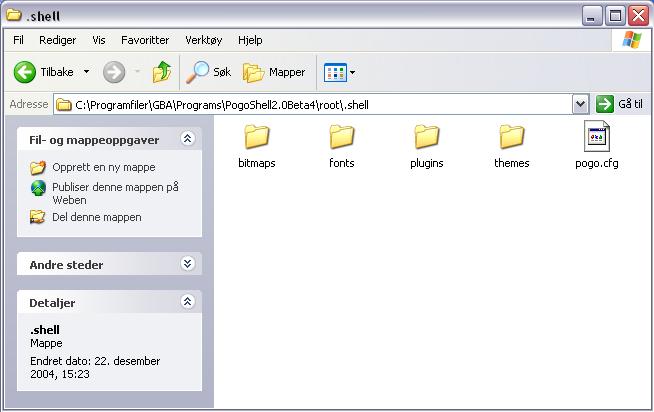
Delete everything inside the themes folder, the bitmaps folder and the fonts folder EXEPT dungeon7.font (this font is used for the text reader and there is no guarantee that it's included in the new theme, so leave it just to be sure). Make sure you don't delete the plugins folder though.
The old theme is now deleted. Lets go back and check out the folder with our new downloaded themes.
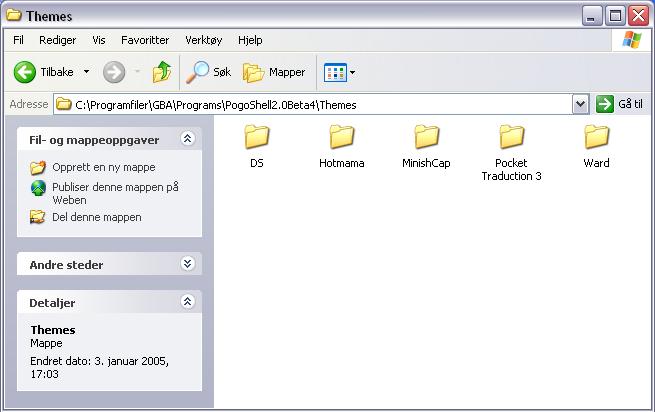
These are the themes I downloaded. Inside each folder there is a .shell folder along with a picture preview and a read-me file. To install the theme, all you need to do is mark the .shell folder to the theme you want by clicking on it and copying it (CTRL+C). Then go back into your root folder and past it there (CTRL+V). It will ask if you want to overwrite or not. Click Yes to all. Now go back and run build_xrom.bat. Test your file in VBA. Here is the result of my example:

Note: If you already have edited the pogo.cfg file (in .shell) you will need to do this again because a new one will be overwritten to work better with the new theme. You can take a backup before installing the theme and copy over the changes if you for example have edited the users or something like that.
Users:
Actually, this is a feature that many people don't know about. If you are using Pogoshell and don't know how users works, read on!
Users allows you to store more savegames than the game has slots for. How annoying isn't it if your friend wants to start a new game but the game only has one save slot? Users fixes that problem. Each user has it's own set of saves. When you change user your saves on your other users will be "hidden" from the SRAM drive and from all your games as well. Changing user is simple. In the Pogoshell menu press START to bring up the menu and select Change User.
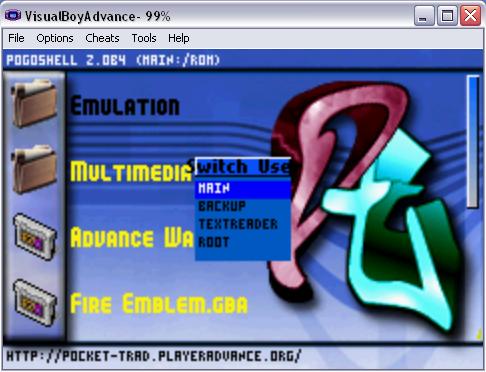
It will bring up a list showing your current users. By default this is what it looks like.
main: This is the user you normally use.
backup: This is the second user. Can for example be used by a friend or as a backup user.
textreader: This user is only used to keep your bookmarks in the textreader. Don't use this for normal saves. You should only use it if you want to delete bookmarks etc. your textreader bookmarks will go here automatically, so no need to change before using the textreader.
root: This will show all saves on the cart. This is handy if you have a lot of users and you are going to manage them all at once to clean up a bit. Use root and go into the SRAM drive to manage them.
Note: If you already installed wabo's theme, chances are it will say wabo instead of root. That means he already changed it before packing the theme. I am going to show you how to change it yourself in a bit.
If you are still unsure of how this whole thing works, do the following...
Start a new game (with the main user) and save somewhere. Go back into Pogoshell and change user to backup. Now open the same game. You will see that the savegame is no longer there. Start a new game in the same slot. Go somewhere else and save. Return to the Pogoshell menu and change user back to main again. Launch the game and load your savegame. As you can see your first save is back so you now have TWO saves for a game that only allows one save (or 2 saves on the same saveslot. It depends on the game of course). I think you get the idea of how it works now...
Ok, lets move on to the next topic. How to change or create your own users! To do this we will be using pogo.cfg located in the .shell folder. Open this file in notepad and scroll down until you see [USERS]
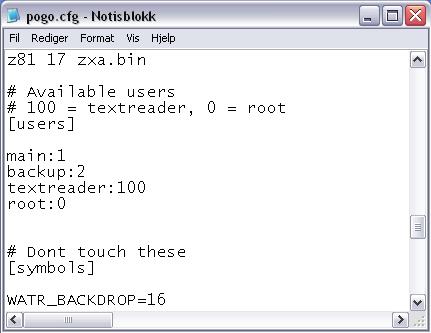
This is what it looks like by default, and as you can see 100 is the textreader and 0 is root. Others than that you can do exactly as you want. Change anything you like. You can change the names, or add new lines with new ID's to make new users etc. Just make sure you don't mess up the root and textreader. You can change their names just don't change the ID. I edited mine a bit and now it looks like this:
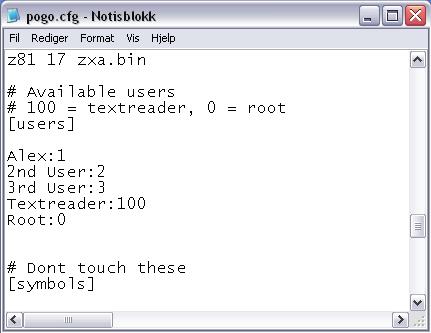
Alex is my saves, 2nd and 3rd users can be used by friends (for 3rd user I added a new line and gave it ID 3). When you're done you just hit save and you're ready to build flashme.gba again. Test it in VBA and open the user menu.
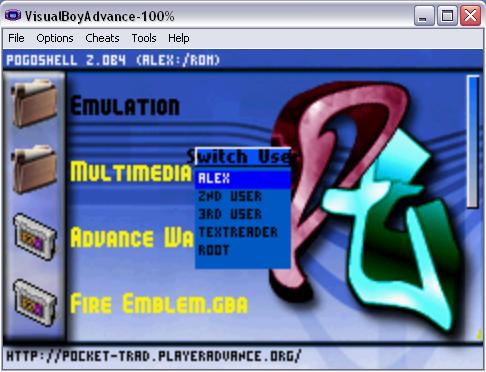
Yup. Works like a charm. Also note that it now says (ALEX:/ROM) on the top instead of (MAIN:/ROM) like it did before. It will always show the current user here.
Tip: To move saves between users, first select the user to copy from and go into the SRAM drive. Press START and select CUT. Then change user and choose PASTE.
Save Management:
Here I'll explain how to backup and restore saves from and to Pogoshell I recommend you first download SRAM explorer version 2.0 Beta4 here. With this tool you'll get full control over your saves. It's not necessary, but it's a really nice program to have.
I'll be using X-Rom Flasher in this guide (simply because it's the best choice when using Pogoshell), but if you prefer LittleWriter that's fine too. It's the EXACT same thing so it shouldn't be a problem.
First... how to backup ALL your saves at once.
Boot your GBA for flashing like normal, plug it in the linker and open X-Rom Flasher.
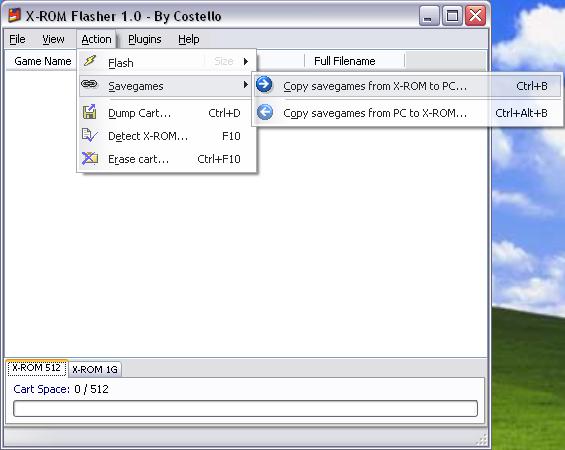
Click Action, Flash, Savegames, Copy savegames from X-ROM to PC (or just click CTRL+B).

This window will pop up. Choose BANK 1 and 256 kB size. The output savegames should have the *.dump extension. You CAN have *.sav as well but it's not a normal save game. It contains ALL your saves backuped from Pogoshell So to not mix these different filetypes just use *.dump
To backup a single savegame from Pogoshell it's the same procedure except that you FIRST have to boot up your GBA and then start the game to backup from. Then turn the GBA off and back on, but this time WITH START + SELECT! You also have to choose 64kB size instead of 256. But BANK 1 is still correct. This time backup to *.sav! Because now it IS a normal savegame.
Now I'll go through how to restore savegames and send them back to the cart. This is even easier.
IF you are sending a single *.sav file, you must first boot your GBA and launch the game the save belongs to (if you're sending a *.dump you can skip that step). Turn off your GBA and boot it again this time with START + SELECT, plug it in and open X-Rom Flasher.
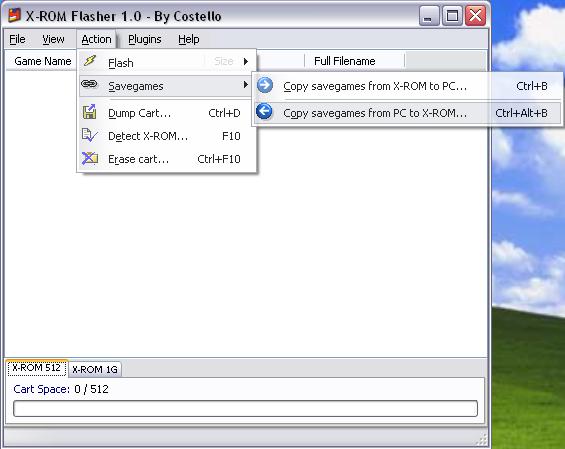
Now choose Action, Savegames, Copy savegames from PC to X-ROM (or press CTRL+ALT+B).

BANK 1 is correct. Select the file to send... Either *.dump or *.sav and click LOAD!
Installing Plugins:
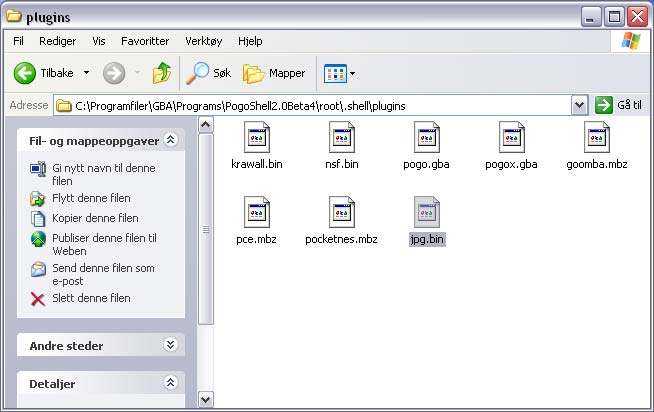
Plugins is one of the most important features of Pogoshell It will make your life much easier =) There are already quite a few pre-installed plugins in Pogoshell But there are a lot more floating around the net. I will now show you have you can install your own plugins into Pogoshell First you need to download the plugin. You can for example use the JPG plugin by moonlight. Download this plugin here. Unzip jpg.bin into the plugins folder in the .shell folder.
That's basically all you have to do to install it. However there is another step we need to complete for Pogoshell to know WHAT filetype to be recognized (*.jpg in this example) and WHAT plugin to execute when a file with that extension is opened. To do this we have to use the pogo.cfg file again, located in the .shell folder. Open it in notepad. This time we wont be looking at the users part like we did before (in the users chapter). Now we will be editing the [FILETYPES] Part.
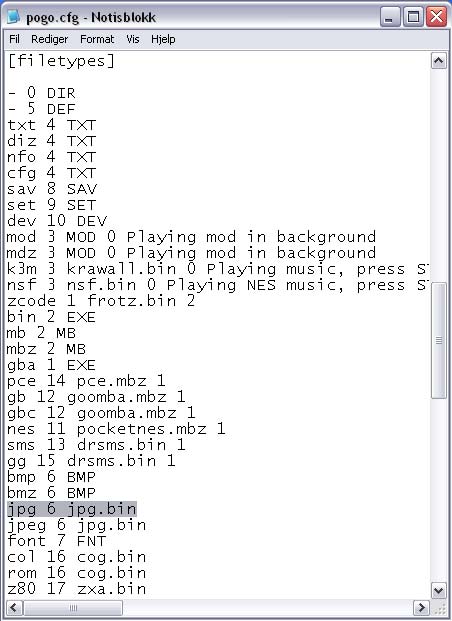
Ahh, but once again bilwabo has made it easy for us. If you already installed any of his themes, chances are the filetypes list is complete. But to be sure, just check anyway. If you didn't add any themes yet, or still have the default pogo.cfg it will look like this:

Don't panic if it does. Simply add the line "jpg 6 jpg.bin", save, and you're done installing the theme!
Note: The "6" in this line represents the icon number. How do we know 6 is right one? You can check this by going into the gfx folder and open icons.bmp. If you now count the icons from the top to bottom (the first one is 0) the icon with the paint bucket is no. 6. This only counts for the default theme of course, however most themes use the same numbers for the same icons to avoid confusion. If this is not the case for your theme, and the creator didn't complete the filetypes list, you will just have to trial and error to get it right.
I think that's all you need to know to get going. But if u want to get everything possible out of Pogoshell you might want to read the following chapters, but it's for advanced users only and it's not really necessary for most people.
Advanced chapters:
Read the following if you want to get even more out of Pogoshell
More about pogo.cfg:
So what all the fuzz about this file? This is the configuration file for Pogoshell If you want to change your Pogoshell settings, this is the file to use. I'll explain this file in full with all it's features now instead of just telling you exactly what to do. Open the file (located in your .shell folder) in notepad and we'll go through all the steps. The first one is...
[settings] SRAM=192 is how much of the SRAM that should be compressed out of the 256 kB in total. In theory you should be able to change it with 128 to get bigger saves to fit (since it will give you 128 kB of UNCOMPRESSED data, thus making it possible to have bigger saves than 64 kB). However this doesn't work in this version! DON'T change this value, it will make games not work! Leave it as it is for now. The lines below are the paths to your system files. If you change this you must move your files to the new location(s) as well. I recommend just leaving it as it is to avoid confusion and errors, but if you want, you can change it.
[texts] All these lines here are the different messages or questions etc. that you will get in Pogoshell on the screen. All of them are there and you can change it to whatever you like to change the text on your cart. You can for example translate it to your own native language or just change them for fun. Like instead of "Welcome to Pogoshell" you can make it look cooler by changing it to "Pogoshell on X-Rom 512 Mb" for instance. It's up to you.
[filetypes] Here's a list of all filetypes that Pogoshell will be able to recognize. You can add your own too, but of course, if the file has to be executed you will need something (a plugin) to execute the file with. You can download plugins and put them in your plugins folder (this folder can be changed under [settings], but by default it's .shell/plugins). After the plugin is there you must add a line and enter all info needed under [filetypes] so the shell will recognize the filetype that should be executed. The info you have to enter goes like this: <extension> <icon> <handler> <savetype> <description>. If you didn't quite get that I'll show you a few examples.
Look at the line for k3m modules: "k3m 3 krawall.bin 0 Playing music, press START to quit". I'll break it down for you...
<extension> |
<icon> |
<handler> |
<savetype> |
<description> |
k3m |
3 |
krawall.bin |
0 |
Playing music, press START to quit |
This is the extension to be recognized in the shell (*.k3m) |
This is the icon number with will show next to all k3m files. |
This is the plugin filename. It can be found in the plugins folder. |
Well, the k3m player doesn't actually save so its not really needed (that's why it's 0) but since there is a description too it has to be there. |
This doesn't really show up anywhere since the k3m player is currently in full screen, but it DOES show on the mod player. |
Next an example that doesn't use a plugin: "GBA 1 EXE"
<extension> |
<icon> |
<handler> |
<savetype> |
<description> |
GBA |
1 |
EXE |
||
Tells the shell that it's the GBA extension that should be recognized |
This icon will show next to all GBA games |
This is NOT a plugin. Well, not exactly. It tells the shell to open this file directly like any normal GBA game. Just like TXT is used for text and SAV for savegames. |
Not used. It will save the normal way since its not a plugin |
Not used since it runs in full screen. |
And then an emulator : "nes 11 pocketnes.mbz 1"
<extension> |
<icon> |
<handler> |
<savetype> |
<description> |
nes |
11 |
pocketnes.mbz |
1 |
|
The file is *.nes |
The icon next to all nes roms will be no. 11. This may be different from theme to theme. |
The plugin which will be used to open the nes rom. This file is in the plugins folder. |
Savetype 1 = One separate *.sav for EACH rom/file. Savetype 2 = Only one *.sav file for the entire emulator/plugin (in this example it would be pocketnes.sav) |
Not used since it runs in full screen. |
You'll figure out the rest. It's pretty much the same for all different filetypes except that not all needs descriptions and savetype.
There's another thing to note about the filetypes as well. The order the lines are in DOES make a difference. For example you will see that TXT is above GBA, so all text files will show ABOVE your GBA roms IF you choose to sort the files by its filetype instead of the names. So if you don't like the way your files are sorted you can rearrange the lines in a different order to change that. Enough of filetypes... lets move to users
[users] Hmm, actually I think I have covered this in full up in the Users chapter. I Don't think I forgot anything. Read that if you haven't already.
[symbols] You might have noticed it says "Don't touch these" and it does so for a reason. You better just leave this alone or you will get problems getting the shell to work.
That's all you need to know about pogo.cfg
Compressing plugins/MODs:
As you may, or may not have noticed, Pogoshell has a built-in module music player (*.mod). Now, these files CAN be played out-of-the-box without compressing or converting, but if you want to save some space on the cart it might be a good idea to compress them to (*.mdz).
Note: Some of you may already know that to convert MODs into MDZ all you have to do is zip it with winzip and rename it to *.mdz. This wont work with Pogoshell as it handles the compression differently that windows. You need to use a program to compress them.
To compress the modules you will need to use the program called "dcmp.exe" located in your tools folder. This must be run in a command dos prompt just like usbcable.exe. The command is "dcmp <input> <output>". Here's an example: To make things easier, I first place the mod into the same folder as the program. Then I open cmd and once in the tools folder, type the following command: dcmp song.mod song.mdz
After a few seconds the file will be created in the same folder. That's it. The new file wont work in a mod player or tracker but Pogoshell will be able to open it fine. Just make sure that the uncompressed version of the compressed file is LESS than 256 kB as it has to be extracted in the RAM on the GBA and that can only hold 256 kB. If the file is a uncompressed MOD you can still play it, even if it's over 256kB. Only the compressed mods needs to be extracted to the RAM.
If you want to compress a plugin it's the same thing. You should use the command dcmp plugin.bin plugin.mbz. Notice the difference between MDZ (compressed module) and MBZ (compressed plugin).
Converting s3m modules to k3m:
The built-in MOD player in Pogoshell only plays 4-channel protracker modules. In other words, it's very limited. But there is actually a S3M player too called krawall which supports much more advanced modules with more effects and up to 32 channels. However, each song must be converted into the K3M format. You can do this with a special converter which can be downloaded here. You will also need a gcc-compiler for the converter to work. Ah well, I already saved you the trouble if you don't already have one... here is a pre-packed converter containing all the necessary files. You don't need anything else. Now just put your *.s3m files into the same folder and use this command to convert: conv <filename>
The program will spit out the converted file: <filename>.k3m.